Showing posts with label dinner. Show all posts

Friday, November 12, 2010

Mushroom Lasagna (aka a Way to Decimate a Clean Kitchen)

Mushroom Lasagna

When I was shopping for the ingredients for this lasagna, I felt fancy. I went to the market (not the run of the mill Safeway either, mind you), meandered through the aisles with my quaint shopping basket, and browsed the produce section.

I bought portobello mushrooms for the first time in my life. So exciting. I loved seeing all of the exotic types of mushrooms, and sorely resisted the urge to buy some shiitakes (comeon, you know it's fun to say "Shiiiiiit...ake).

While I hadn't intended on buying spinach lasagna noodles, the market was out of the regular kind, so I said to myself, "Hey, why not?" And it turned out to be one of the best substitutions I've ever made, because the the green pigment made the lasagna look beautiful. It was an appearance that was almost equal to its taste, but let me tell you the taste by FAR surpassed any beauty that the green noodles provided.

I'm pretty confident that I used every single dish in my apartment to create this masterpiece, and if you saw a picture of the state of my kitchen after this thing went in the oven, you'd think you were looking at a scene from a horror movie.

But it was worth it. Ohhhh was it worth it. The portobellos had so much flavor, and the combination of earthy mushrooms with a creamy bechamel sauce and slightly spinachy noodles made for the best dinner I've ever eaten outside of a restaurant.

(Also, for a new blog feature! At the end of every post I'll let you know what music I'm listening to while I blog. It's my favorite time to listen to music, and I think it'd be interesting to track my song obsessions through this site.)

Current Song Obsession: YourBiggestFan by Nevershoutnever!

Mushroom Lasagna Recipe:
Adapted from Smitten Kitchen 


Salt
Olive oil
3/4 pound dried spinach lasagna noodles
1 large clove garlic, minced
4 cups whole milk
3/4 cup (1 1/2 sticks) unsalted butter, divided
1/2 cup all-purpose flour
1 teaspoon freshly ground black pepper
1 teaspoon ground nutmeg 
1 1/2 pounds portobello mushrooms
1 cup freshly grated parmesan

1. Preheat oven to 375F. Bring water to boil in a large, wide pot with a little salt and oil for your lasagna noodles. (You can use this pot to saute your mushrooms later.) Once boiling, add noodles and boil for 10 minutes. Drain and set aside.
2. For bechamel sauce: In a saucepan, bring milk and garlic to a simmer. In a separate saucepan, melt 1/2 cup butter and add flour. Cook 1 minute over low heat, whisking constantly. In small amounts, begin adding the milk mixture to the butter/flour mixture., stirring until combined. Continue to do this until all of the milk is incorporated. Add 1 1/2 teaspoons salt, the pepper, and the nutmeg. Cook over a medium-low heat, stirring often, until thick (about 3-5 minutes). Set aside.
3. For the shrooms: Lightly wash mushrooms and discard the stems. Slice mushrooms 1/4 inch thick. On medium heat in the same pan you used for the noodles, heat 2 tablespoons olive oil and 2 tablespoons butter. Add 1/2 of the mushrooms with a pinch of salt and cook for 5 minutes, until tender and release some of their liquid. Repeat with the other half.
4. Lasagna Assembly: In a 8 x 12 pan, spread some of the sauce. Add a layer of noodles. Then 1/4 of remaining sauce. Then 1/3 of mushrooms. Then 1/4 cup grated parmesan. Repeat two times, finishing with a final layer of noodles, sauce, and remaining parmesan.
5. Bake for 45 minutes, until top is browned and bubbly. Let sit 15 minutes. Consume epically delicious food.

Monday, October 4, 2010

Zucchini Mozzarella Grilled French Toast Sandwiches

Zucchini Grilled Cheese 4

Wow. Whadda title, right? If you have one eyebrow raised in confusion, I really don't blame you. So many words thrown together, that it almost doesn't sound like it would be appetizing. But let me tell you: this is by FAR the best easy dinner I've made myself in quite a while.

It combines the great, gooeyness of a fresh mozzarella grilled cheese sandwich and the great heartiness of french toast. How does this sandwich accomplish this? By egg-dipping the sandwich before grilling, of course!

Zucchini Grilled Cheese 3

Now, I added the zucchini to make it healthy. If it has vegetables in it, it has to be good for you, right? Hmm... well, at least that's what I keep telling myself. Let's not take into account that I consumed half of a sauteed zucchini whilst waiting for my sandwich to grill.

But I really did tone down the unhealthiness of this recipe a bit (although if I had had the proper ingredients, things might have turned out verrrrry differently). I used whole wheat bread and used considerably less mozzarella than the recipe called for, and it still tasted amazing.

Zucchini Grilled Cheese 2

It was as if I had stepped in to a diner - there was the sizzling sound of oil on the stove and I could literally smell my sandwich getting crispy (is it possible to smell crispiness? I say it is).

Of course, the easiness of this recipe is somewhat mitigated by the heap ton of dishes that it accumulates (due to the three plates for dipping), but man oh man is it worth it.

Recipe:
Heavily adapted from "Nigella Bites" recipe for Mozzarella Carrozza


1/2 of a medium zucchini, cut into 1/4 inch slices
2 slices of bread
1 teaspoon fresh basil
1/4 cup mozzarella cheese (1/4 inch slices, preferrably)
1/4 cup milk
1 1/2 tablespoons flour
1 egg
salt and pepper
olive oil

1. In a frying pan, saute the zucchini slices in olive oil until slightly tender. Remove from heat.
2. Meanwhile, sprinkle basil on one slice of the bread, followed by evenly distributed mozzarella slices. When zucchini has finished, distribute on top of the mozzarella. Put the second bread slice on top, squishing the sandwich down a bit so it all sticks together.
3. Pour milk in one saucer, flour in another, and beat the egg with salt and pepper in another. As quickly as possible, drip sandwich in milk (bread will become too soggy quickly, so speed is crucial), then flour, then egg.
4. Using same pan as zucchini, put a hefty amount of oil in bottom and heat over medium heat. Add sandwich and fry in oil until crisp on each side. Cut in half. Apply to face and smile.
Makes 1

Sunday, September 19, 2010

Sometimes I get stressed, but I still have Spicy Quinoa Salad for you

Quinoa Salad

Here's a list of things I should be doing right now:
- Reading for my classes
- Applying for a scholarship for going abroad
- Studying Italian
- Finding a way to exercise off my Ici ice cream

That list has stayed about the same all weekend. All. Weekend.

And why is that? Because I've been lazy this semester. For some reason, I just can't get into school mode, and it's really taking a toll on my mental health. The reading I'm not doing is going to leap out on Wednesday at 10 saying "SURPRISE! Don't you wish you had read me sooner so you don't panic about having to read 150 pages in 2 hours?"

That's what happened last week, and I told myself I wouldn't put it off for the next week. But here I am on Sunday night, still not done with the week's work. And I start my job this week, so that's 14 hours less time to read that I had last week. It's an endless cycle in my head of the things I need to do, and it's weighing so heavily on me right now.

Frustration is an emotion that's all too prominent in my life at the moment, and I really just need to step back, take a few breaths, and then dive back in head first to meet my tasks head on. Tomorrow is a new day and I will start anew. Wake up, get ready to go, study, go to work, and just make my To Do List shrink exponentially.

So thanks for reading my little vent (or at least pretending to read it - no hard feelings). I really did enjoy this quinoa salad, though. So nice for a warm day - the tomatoes and avocados calm your mouth as the peppers make it spicy in this delicate balance of heat and cool. Also, I thank my roommate, Sowmya for taking this picture. She's not a food photographer by practice, but she sure took a good shot!

Recipe:
Adapted from NYTimes

Print Me! 

1 cup quinoa
3 cups water
Salt to taste
2 cups diced cucumber
1 small red onion, finely minced (optional)
2 cups finely diced tomatoes
1 to 2 serrano peppers (to taste), seeded if desired and finely chopped
1/2 cup chopped cilantro, plus several sprigs for garnish
2 tablespoons fresh lime juice
1 tablespoon red wine vinegar or sherry vinegar
3 tablespoons extra virgin olive oil
1 avocado, sliced, for garnish

1. Place the quinoa in a bowl, and cover with cold water. Let sit for five minutes. Drain through a strainer, and rinse until the water runs clear. Bring the 3 cups water to a boil in a medium saucepan. Add salt (1/2 to 3/4 teaspoon) and the quinoa. Bring back to a boil, and reduce the heat to low. Cover and simmer 15 minutes or until the quinoa is tender and translucent; each grain should have a little thread. Drain off the water in the pan through a strainer, and return the quinoa to the pan. Cover the pan with a clean dishtowel, replace the lid and allow to sit for 10 minutes. If making for the freezer, uncover and allow to cool, then place in plastic bags. Flatten the bags and seal.
2. Meanwhile, place the finely diced cucumber in a colander, and sprinkle with salt. Toss and allow to sit for 15 minutes. Rinse the cucumber with cold water, and drain on paper towels. If using the onion, place in a bowl and cover with cold water. Let sit for five minutes, then drain, rinse with cold water and drain on paper towels.
3. Combine the tomatoes, chiles, cilantro, vinegar, lime juice and olive oil in a bowl. Add the cucumber and onion, season to taste with salt, and add the quinoa and cilantro. Toss together, and taste and adjust seasonings. Serve garnished with sliced avocado and cilantro sprigs.
 

Tuesday, August 31, 2010

Holy stovetops Batman! It's Polenta!

Polenta

Remember when being nerdy started being cool? I sure do.

They began putting superheroes on shirts in department stores. Lord of the Rings was made into a movie trilogy that made gajillions. Rubix cubes started becoming a plague. These things all make my heart smile.

And perhaps, just perhaps, my geeky excitement about how awesome polenta will catch on, too. You'll help me make the trend happen, right?

I was literally giddy with excitement when I licked the pot clean while I waited for the polenta to cool in the fridge. It just tasted so good!

And the finished product (meaning chilled then sauteed)? Heavenly. No, scratch that - in honor of our geek-themed blog post, let's say that the finished product was: ZEUSLY (Guess who's on a Greek mythology kick right now?)

I even pretended that I was dining in a fancy restaurant when I ate my dinner, because if I closed my eyes, the food tasted like 5 star material. No joke.

Without further ado, I present to you... POLENTA!

Polenta 2


Recipe:
Adapted from Alton Brown's (Good Eats) Recipe

2 tablespoons olive oil, plus extra for grilling or sauteing if desired
3/4 cup finely chopped yellow onion
2 cloves garlic, finely minced
4 cups (2 cans) vegetable stock or broth
1 cup coarse ground cornmeal
3 tablespoons unsalted butter
1 1/2 teaspoons kosher salt
1/4 teaspoon freshly ground black pepper
1 ounce Parmesan, grated


1. Preheat oven to 350 degrees F.

2. In a large, oven-safe saucepan heat the olive oil over medium heat. Add the red onion and salt and sweat until the onions begin to turn translucent, approximately 4 to 5 minutes. Reduce the heat to low, add the garlic, and saute for 1 to 2 minutes, making sure the garlic does not burn.

3. Turn the heat up to high, add the vegetable stock, bring to a boil. Gradually add the cornmeal while continually whisking. Once you have added all of the cornmeal, cover the pot and place it in the oven. Cook for 35 to 40 minutes, stirring every 10 minutes to prevent lumps.

4. Once the mixture is creamy, remove from the oven and add the butter, salt, and pepper. Once they are incorporated, gradually add the Parmesan.

5. Serve as is, or pour the polenta into 9 by 13-inch cake pan lined with parchment paper. Place in the refrigerator to cool completely.

6. Once set, turn the polenta out onto a cutting board and cut into squares, rounds, or triangles. Brush each side with olive oil and saute in a nonstick skillet over medium heat, or grill.

Monday, June 7, 2010

Mission: Homemade Pasta, Status: Complete


For years I was intimidated by homemade pasta. Sticky dough, stringy noodles, gross textures... all of these potential pasta-making hiccups truly terrified me. But I finally told myself to just pluck up the courage and try it - the worst that could happen was that my family would politely smile through the first few bites and then order a pizza.

Knowing that even though the recipe sounded simple, I would need lots of time (being the novice cook that I am), so I started my pasta at 4, hoping to have it on the table by 6:30.


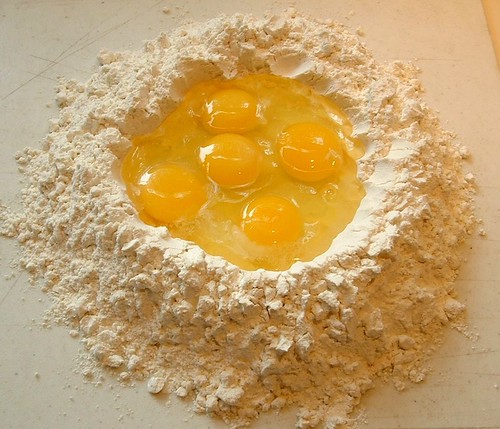
So... I'm not gonna lie - I was really, REALLY excited to get to mix the pasta dough by hand. When I first heard that this was how pasta dough was made, I was skeptical, but after several confirmations on this fact, I started getting giddy. Playing with my food? Awesome! Starting the process by making a flour-well with eggs inside, I felt confident, because this is how it was supposed to look (no mess-ups yet - go me!).


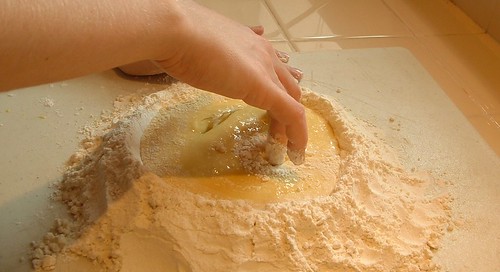
Swirl, swirl, swirl; mix, mix mix. Gooey hands, messy counter top. So messy, in fact, that I had to ask my mom to take some of my photos for me, because as you can see...


...my tripod wasn't going to work for this situation.


After much mixing, my dough finally started to come together into one, sticky lump. I kept adding flour and kneading the dough, and with some tender-loving care, my dough turned into a ball. I had a lot of the original flour left over, so I strained it in a mesh sieve to get out all the little egg-crumbs and put it in a bowl (you can see it in the above picture) to use for the rest of the pasta process. Yay for being economical!

So far so good, right? Well, technically yes. However, when I rolled out the first quarter of the dough and tried to cut it up, my noodles kept sticking together. Uh oh. It was now past 5:00, and with three more portions to do, I started panicking that there wouldn't be enough time. The result? No pictures of my rolling/cutting process. Sorry guys :(

However, I found a solution: use lots and lots and LOTS of flour. Like, when you think you've used enough flour, use more. Seriously. I figured this out after the first two batches of sticky noodles, and the last two batches went much more smoothly because of it.

Then the moment of truth arrived: boiling the pasta and testing it. My heart was pounding, and my worry-brow was forming (you know that crease you get in your forehead when you're stressed?), but after a few minutes, I tested a noodle and....

It tasted like pasta. Wow! I felt a little silly, because for some reason I didn't think that homemade pasta would taste like normal noodles. They did, in case you're wondering. But they tasted good! Something about the homemadiness made the noodles taste extra delicious, even more so than boxed pasta (a favorite of mine to begin with).

The only bad part of this whole experience was that dinner was late. Because of my battle with the two sticky batches of dough, dinner didn't get on the table until 6:50. Whoops. But I feel like this is the type of dish that can potentially go really quickly once you get the hang of it, so next time I make it I won't have to wrestle with sticky noodles for half an hour.

My family seemed to enjoy dinner, despite it's tardiness, and there was one final surprise for all of us: homemade pasta fills you up really, really quickly. After one moderate portion for all of us, we felt incredibly full. So full, in fact, that despite the pasta's deliciousness, we couldn't make room for seconds or else we'd burst. This meant that even though the noodles were feeding 5 people, we had enough leftovers to feed us all for a second dinner. Homemade pasta leftovers? I definitely didn't complain :)


Recipe:
Adapted from the Joy of Cooking

3 1/2 cups all-purpose flour
5 large eggs
1 teaspoon salt (optional)
1 teaspoon extra-virgin olive oil (optional)

1. Mound flour onto a clean counter, make a well in the center. Add eggs and optional ingredients to well. Using your hands, beat eggs, drawing in some flour as you go. Gradually incorporate the flour into the eggs and blend everything into a smooth, not too stiff dough. If the dough feels too dry and crumbly, add water as needed. Knead the dough until satiny and very elastic, about 10 minutes. Cover in plastic wrap and let dough rest for 30 minutes.
2. Generously flour a large surface. Cut dough into 4 pieces. Using only one piece at a time, roll out dough until 1/32 inch thick (you should be able to see magazine words though the dough, but not necessary make out what they say). Cut dough as desired. If making fettuccine, spaghetti, or some other thin noodle, cut strips narrower than you want them to be, as the dough will expand when boiled.
3. Bring a large pot of salted water to a boil. Depending on noodle type, pasta can be done as soon as 2 minutes, so keep testing until noodles are al dente and no longer taste like raw flour.

Wednesday, May 26, 2010

Baking with Kids: Tips and Tricks

My youngest brother was born when I was 14 and my other brother isn't much older - he was born when I was 11. This huge age difference caused me endless strife in high school, because I was constantly asked to babysit them after school and on weekends. While I enjoyed spending time with my little brothers from time to time, this rarely included something as involved as a baking project.

Since I have grown older and a tad bit wiser (although this point is arguable), I have come to realize that it's really fun to do things with my brothers, because they hold the time they spend with me very dear. Because of this, I decided to include them in my baking project the other day: making cornbread for dinner. (That's them in the picture, there. They're standing in front of our cornbread, but there's a terrible glare on the dish so you can't really see it... oops.)

In the past, the few baking projects I did with my brothers during high school were really frustrating for all of us. I'm a control freak who wouldn't let them help enough, they wanted to help TOO much, and then they ended up getting bored and leaving me to finish the project. Fun to an extent, but definitely lacking a good ending, don't you agree? To remedy this, I used several techniques I learned last summer as a camp counselor to help our most recent cooking project be more satisfying to all involved parties.


After a very successful batch of cornbread, I though to myself, "Hey, maybe there are some people out there in the internet world who would appreciate some tips on how to doing baking projects with their kids!" And that is the thought that inspired me to write this post. So the following is a list of things that I have found helpful when working with young children (my brothers are aged 8 and 5, if that gives you a reference point for what ages I'm dealing with).

Tips and Tricks:
  1. If you have a child that can read, have them read the list of ingredients and help to gather everything that is needed. This will help them feel included immediately, and will warm both of you up to each other's presence in the kitchen.
  2. Use a recipe that is pretty simple: not too many ingredients, no finicky steps (such as soft vs stiff peaked egg whites), and preferably something you have made before so you can catch when things are going off-track.
  3. If you have more than one kid working with you, make sure you alternate when each of them helps. This cuts back on sibling rivalry making for frustrated kids - if they feel included, they won't be jealous of their brother/sister.
  4. Do all the dangerous stuff yourself (ie putting things in the oven, cutting with sharp knives, and getting things off of high shelves), but explain why you are doing it. For example, say, "I am going to cut up this apple. Why do you think it's important to be careful when working with this knife?" Even though they won't be doing the cutting, they'll feel included because they are answering a question.
  5. Feel free to teach them things about cooking/baking as you work on your project. By telling them what baking powder does or why it's important to grease the pan, they understand the process better, and it allows for more interaction between yourself and the children.
  6. Let the kids crack the eggs, but make sure you do it in a separate bowl. This way you can fish out the inevitable bits of egg shell that end up mixed in with the egg.
And for all of you that are interested:
Cornbread Recipe:
Adapted from Albers Sweet Corn Muffins

1 1/2 cups all-purpose flour
1/2 cup white sugar
1/2 cup yellow or white corn meal
1 Tablespoon baking powder
1/2 teaspoon salt
1 1/4 cups milk
2 eggs, lightly beaten
1/3 cup vegetable oil

1. Preheat oven to 350 F. Grease an 8-inch-square baking pan.
2. Combine flour, sugar, corn meal, baking powder, and salt in medium bowl. Combine milk,eggs, and vegetable oil  in small bowl; mix well. Add to flour mixture; stir just until blended. Pour into baking pan.
3. Bake for 35 minutes, or until a toothpick inserted in the center comes out clean.

Tuesday, May 11, 2010

Indian Food: Podimas

Have you ever encountered a food more wonderful and versatile than the potato? Forget odes to sunshine and flowers - someone should write an ode to the Russet Potato. Mashed, fried, baked, in stews, in hash browns, and every time it's wonderful.

So here I am, giving you fellow potato-lovers a new potato dish to add to your repertoire. I love it because a) it's Indian and I LOVE Indian food b) it's cheap, and cheap is always better for the starving student and c) it's quick, so I don't have to wait eons for a good dinner when I get home late.


This dish is called Podimas, and it is basically mashed potatoes (sans the milk and butter) with Indian spices. When you eat it with Chapati, a type of Indian bread, it's doubly delicious (I just use a tortilla instead).

Podimas


Serves 4

2 large Russet Potatoes
1 teaspoon Turmeric
1 teaspoon vegetable oil
1/2 small onion, diced
2 Green Chilies, chopped (optional)
1/4 teaspoon Mustard Seeds
1/2 teaspoon salt (optional)
1/2 teaspoon Sambar Podi (Powder) (optional)


1. Cube potatoes and put into a large saucepan. Cover with water. Add Turmeric powder and put on stove for 20 minutes, until potatoes are soft.
2. Meanwhile, in a large frying pan, heat oil over medium-high heat. Add mustard seeds (they should sound like they are "popping"), diced onions, and green chilies. Sauté until onions are translucent.
3. When potatoes are soft, drain water. Mash potatoes until the have an even consistency (they will appear slightly yellow).
4. Add mashed potatoes to the onion mixture in the frying pan. Add salt and Sambar Podi. Stir until all ingredients are well combined. Reduce heat and cook for 5 minutes.

Friday, May 7, 2010

Easiest Lasagna in the Whole Entire World

As a kid, my mom never wanted to make lasagna - she said it took too long. I always felt like I was missing a crucial part of childhood because I never had homemade lasagna. When I moved into my apartment, I decided that I would make lasagna myself, thank you very much. Then I looked at recipes and realized that it was horribly time consuming. But lo' and behold, a recipe that is quick and delicious!!! (It still has to bake for over an hour, but you can busy yourself with many other things in that time: do laundry, study, clean the kitchen, or just talk with your roommate (my preferred option)).

So without further ado, here it is!

Easy-Peasy Veggie Lasagna
My version serves 6 - the perfect amount for my roommate and I to enjoy for dinner and have leftovers, too!
(Adapted from an allrecipes.com entry: Veggie No Boiling Lasagna)

1 teaspoon olive oil
1/2 onion, diced
1 red bell pepper, diced
1 (15 ounce) container ricotta cheese
1 cup grated mozzarella cheese
1/4 cup Parmesan cheese (i used the powder stuff and it was fine)
1 egg
1 jar (26 ounces) cheap pasta sauce
6 uncooked lasagna noodles

Directions:
1. Preheat oven to 375 degrees F. Heat olive oil in a a medium skillet over medium-high heat and cook onion and red pepper, stirring occasionally, 5 minutes (or until tender).
2. Meanwhile, combine ricotta cheese, 1/2 cup mozzarella cheese, 1/8 cup Parmesan cheese, and egg in a medium bowl. (I left out the egg and it was fine. It was a little harder to spread in the pan because it was thicker,but manageable)
3. Spread 1/2 cup pasta sauce in a 11 x 7-inch baking dish. Layer 2 uncooked noodles, then 1/2 cup sauce, 1/2 of the ricotta mixture and 1/2 of the vegetables; repeat. Top with remaining uncooked noodles and 1 cup of sauce.
4. Cover tightly with aluminum foil and bake 1 hour. Remove foil and sprinkle with remaining mozzarella and Parmesan cheeses. Bake uncovered 10 minutes. Let stand 10 minutes before serving. (I didn't use foil and it was fine. I think it is just meant to make sure that the noodles don't dry out too much. My top noodles were a bit chewy, but I like them that way!)


And there you have it! Super easy lasagna. So go ahead, quench your never-ceding lasagna desire. Make it, eat it, and then say yummmm.

Thursday, May 6, 2010

What a better welcome than Macaroni and Cheese

As every college student knows, Macaroni and Cheese is a staple food source: in less than 20 minutes, you can have the ooey-gooey goodness of pasta and cheese all rolled into one. What's not to love?

Well, at the end of a semester when everyone is tired of living off of peanut butter and jelly sandwiches, cereal, and macaroni and cheese, the prospects for enjoying cheesy pasta seem dire. But fear not, dear readers, because I made the most DELICIOUS macaroni and cheese ever for dinner tonight. Simply by adding some veggies, garlic powder, and breadcrumbs, I transformed this bland dish into something almost magical.

So without further ado, the method:

Ingredients:
1 teaspoon canola oil
1 box of macaroni and cheese
3/4 cup frozen peas
1/2 cup frozen corn
1/2 teaspoon garlic powder
1/4 Italian bread crumbs

1. Make the mac. If you don't know how to do this by now, well... that's just sad- there are directions on the box.
2. In a bowl, microwave the corn and peas (covered with water) for 2 minutes. Drain water.
3. In a frying pan on medium-high heat, heat oil and add cooked macaroni, peas and corn, and garlic powder.  Once hot, add bread crumbs. Stir everything together. Eat (duh).


So there you have it - delicious, nutritious (so many vegetables!), and pretty easy. Say goodbye to dreary old Macaroni and Cheese, and hello to tastiness!